Workshop Guide
Training Environment
Let’s first agree on: AVS = Azure VMware Solution
Azure Portal Credentials
Replace “#” with your group number.
Connect to https://portal.azure.com with the following credentials:
| Username | GPSUS-Group#@vmwaresales101outlook.onmicrosoft.com |
|---|---|
| Password | TO BE SUPPLIED |
Environment Details
Jumpbox Details
Your first task will be creating a Jumpbox in your respective Jumpbox Resource group.
NOTE: In addition to the instructions below, you can watch this video which will explain the same steps and get you ready for deploying the Jumpbox.
The following table will help you identify the Resource Group, Virtual Network (vNET) and Subnet in which you will be deploying your Jumpbox VM.
Replace the word ‘Name’ with Partner name, and ‘X’ with your Group Number
| Group | Jumpbox Resource Group | Virtual Network/Subnet |
|---|---|---|
| X | GPSUS-NameX-Jumpbox | GPSUS-NameX-VNet/JumpBox |
Example - Partner name is ABC and Group number is 2:
| Group | Jumpbox Resource Group | Virtual Network/Subnet |
|---|---|---|
| 2 | GPSUS-ABC2-Jumpbox | GPSUS-Name2-VNet/JumpBox |
Exercise 1: Instructions for Creation of Jumpbox
Step 1: Create Azure Virtual Machine
In the Azure Portal locate the Virtual Machines blade.
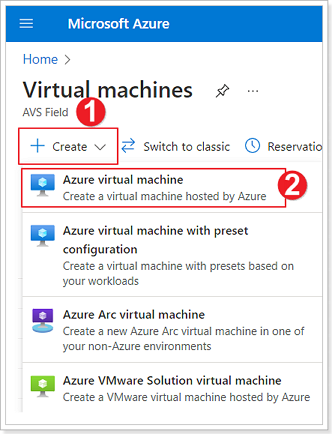
- Click + Create.
- Select Azure virtual machine.
Step 2: Basic information for Azure Virtual Machine
Important notes about the next step
The next step, could be confusing and often, a source of mistakes. Please, pay special attention to the notes at the bottom of the image.
Please notice that PARTNER1 is just a PLACEHOLDER most likely for your organization’s name. Reach out to the moderators for guidance
Do not create a new resource group, please use the existing one. See the notes below about the correct resource group to choose from
Also, once you select the correct resource group the region will be defaulted (populated) with the right value
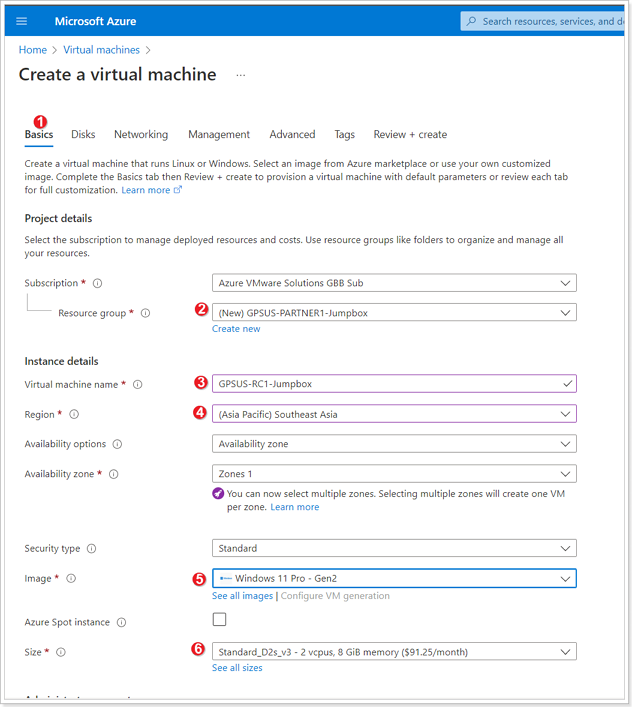
- Select Basics tab.
- Select the appropriate Resource group per the table below.
- Give your Jumpbox a unique name you wish. As suggestion you can use your name initials with the word Jumpbox (i.e. for John Smith it will be JS-Jumpbox)
- Ensure the appropriate Region is selected. Usually it is the default region given you have selected the right Resource Group (see step #1).
- Select the type of the VM image.
Operating System: Windows 10 or Windows 11
- Ensure the correct Size is selected.
Size: Standard D2s v3 (2vCPUs, 8GiB memory)
Leave other defaults and scroll down on the Basics tab.
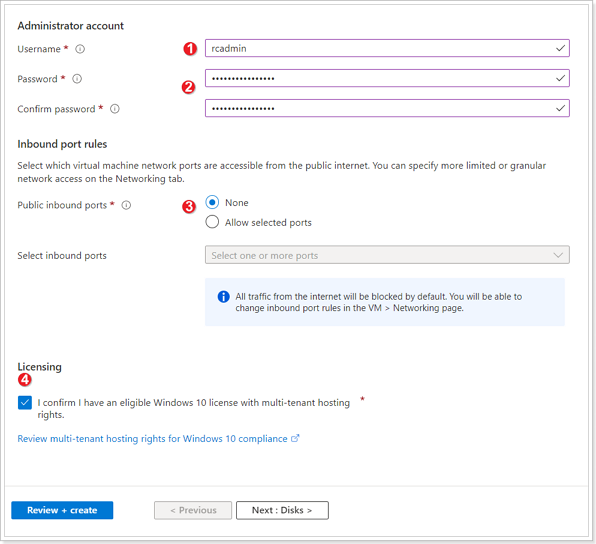
- Enter a user name for your Jumpbox (Anything of your choosing).
- Enter and confirm a password for your Jumpbox user.
- Ensure to select “None” for Public inbound ports.
- Select checkbox for “I confirm I have an eligible Windows 10 license”. Leave all other defaults and jump to Networking tab.
Step 3: Azure Virtual Machine Networking Information
Make sure to select ‘None’ next to the Public IP field.
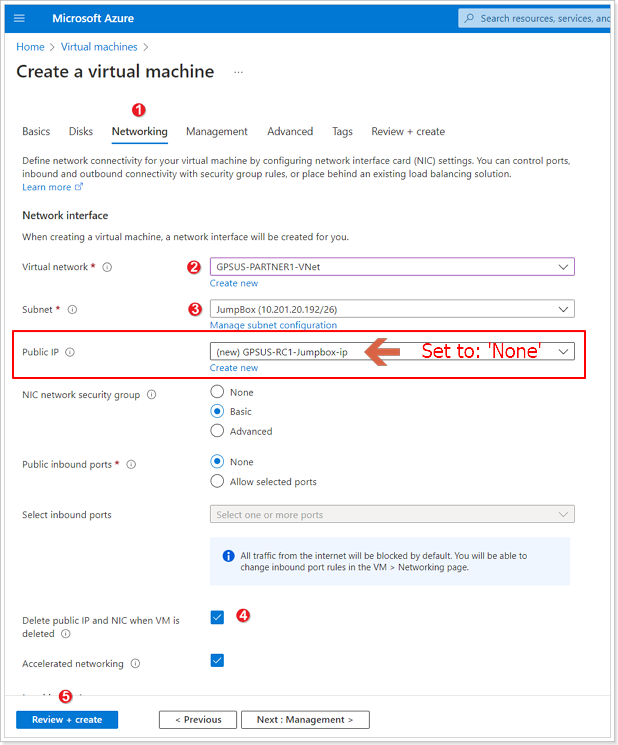
- Click on Networking tab.
- Select the appropriate VNet based on the table below.
NOTE: This is not the VNet that is loaded by default.
- If the appropriate VNet was selected it should auto-populate the JumpBox subnet. If not, please make sure to select the JumpBox Subnet.
NOTE: Please select None for Public IP. You will not need it. Instead, you’ll be using Azure Bastion, which is already deployed, to access (RDP) into the JumpBox VM.
- Select “Delete public IP and NIC when VM is deleted” checkbox.
- Click Review + Create -> Create.
Step 4: Connect to your Azure Virtual Machine Jumpbox
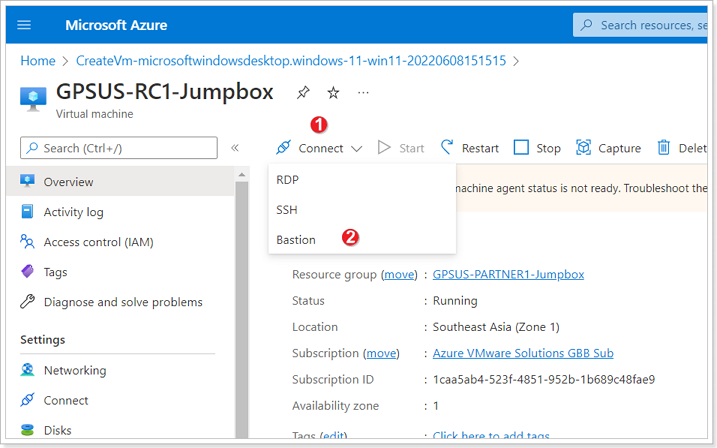
Once your Jumpbox finishes creating, go to it and click: Connect → Bastion
This should open a new browser tab and connect you to the Jumpbox, enter the Username and Password you specified for your Jumpbox.
Make sure you allow pop-ups in your Internet browser for Azure Bastion to work properly.
VMware Environments
AVS vCenter, HCX, and NSX-T URLs
Please refer to the VMware Credentials section under the AVS blade in the Azure portal to retrieve URLs and Login information for vCenter, HCX, and NSX-T.
NOTE: Use the same vCenter credentials to access HCX portal if needed.
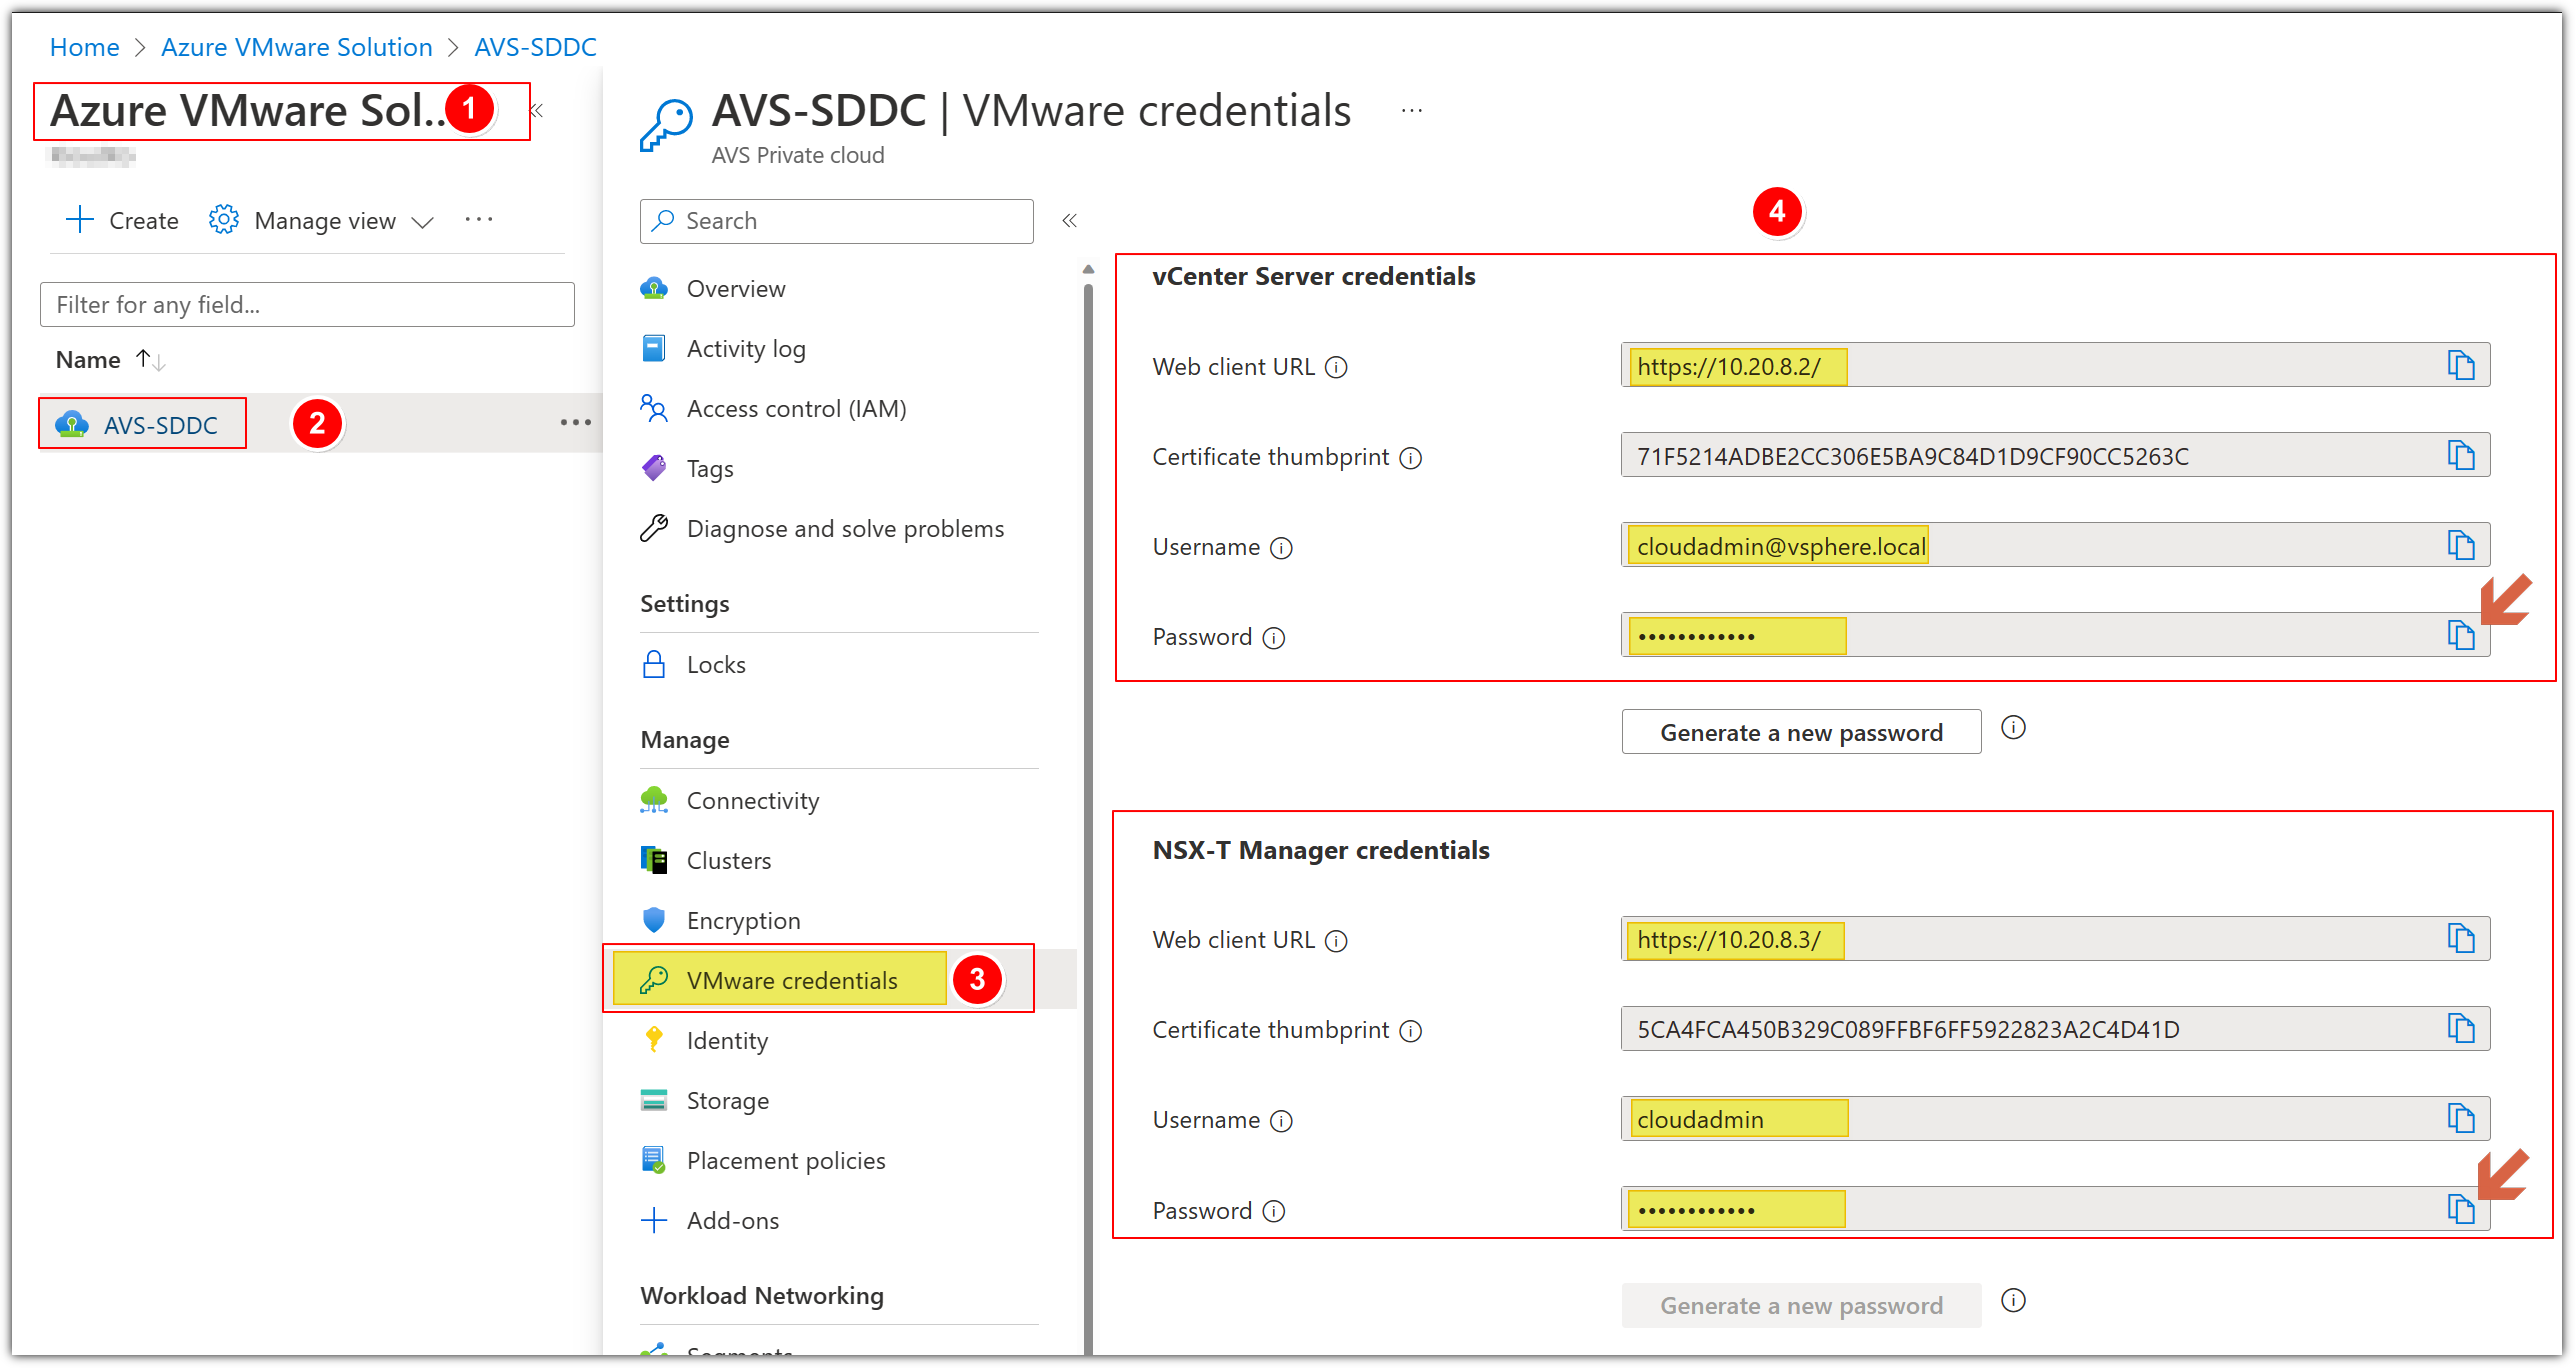
PLEASE DO NOT CLICK GENERATE A NEW PASSWORD BUTTON UNDER CREDENTIALS IN AZURE PORTAL
Note: In a real customer environment, the local cloudadmin@vsphere.local account should be treated as an emergency access account for “break glass” scenarios in your private cloud. It’s not for daily administrative activities or integration with other services. For more information see here
In AVS you can predict the IP addresses for vCenter (.2), NSX-T Manager (.3) and HCX (.9). For instance, if you choose 10.20.0.0/22 as your AVS Management CIDR block, the IPs will be as following:
| vCenter | NSX-T | HCX |
|---|---|---|
| 10.20.0.2 | 10.20.0.3 | 10.20.0.9 |
On-Premises VMware Lab Environment
If you are in a group with multiple participants you will be assigned a participant number.
Replace X with your group number and Y with your participant number.
Generic information
| Group | Participant | vCenter IP | Username | Password | Web workload IP | App Workload IP |
|---|---|---|---|---|---|---|
| X | Y | 10.X.Y.2 | administrator@avs.lab | MSFTavs1! | 10.X.1Y.1/25 | 10.X.1Y.129/25 |
Example for Group number 1 with 4 participants
| Group | Participant | vCenter IP | Username | Password | Web workload IP | App Workload IP |
|---|---|---|---|---|---|---|
| 1 | 1 | 10.1.1.2 | administrator@avs.lab | MSFTavs1! | 10.1.11.1/25 | 10.1.11.129/25 |
| 1 | 2 | 10.1.2.2 | administrator@avs.lab | MSFTavs1! | 10.1.12.1/25 | 10.1.12.129/25 |
| 1 | 3 | 10.1.3.2 | administrator@avs.lab | MSFTavs1! | 10.1.13.1/25 | 10.1.13.129/25 |
| 1 | 4 | 10.1.4.2 | administrator@avs.lab | MSFTavs1! | 10.1.14.1/25 | 10.1.14.129/25 |
Credentials for the Workload VM/s
| Username | root |
|---|---|
| Password | 1TestVM!! |
Module 2 - HCX for VM Migration
Module 2: Deploy HCX for VM Migration
Module 3 - VMware Site Recovery Manager (SRM)
Module 3: Setup SRM for Disaster Recovery to AVS
Module 4 - Secure Hub
Module 4: Create and configure a Secure Hub to route traffic to the internet
Feedback
Was this page helpful?
Glad to hear it! Please tell us how we can improve.
Sorry to hear that. Please tell us how we can improve.
Last modified December 17, 2024: update workflow (8881230)