Module 3 Task 3
Recovery Site
Remember X is your group number, Y is your participant number, Z is the SDDC you’ve been paired with.
In this task you will configure the recovery site GPSUS-PARTNERZ-SDDC with a network segment for the VMs moved by SRM from the primary site. In this lab, we focus on a basic scenario where the VMs protected by SRM do not need to retain their IP address when moved to the recovery site. A DHCP service is used both in the protected and in the recovery site to assign IP addresses to VMs when they boot.
This task requires a DHCP profile to be available in the recovery private cloud. DHCP profiles have been configured in Module 1 for both GPSUS-PARTNERX-SDDC and GPSUS-PARTNERZ-SDDC. If you did not complete the corresponding steps in Module 1, please go back to it and configure DHCP profiles before proceeding.
Log into NSX-T for the recovery site GPSUS-PARTNERZ-SDDC. Please note that, because of the AVS Interconnect connectivity that has been configured in Module 1 between the protected and the recovery private clouds, you can access vCenter and NSX-T for both from the same jump-box.
Exercise 1: Add Network Segment in Recovery Site
Step 1: Add Segment
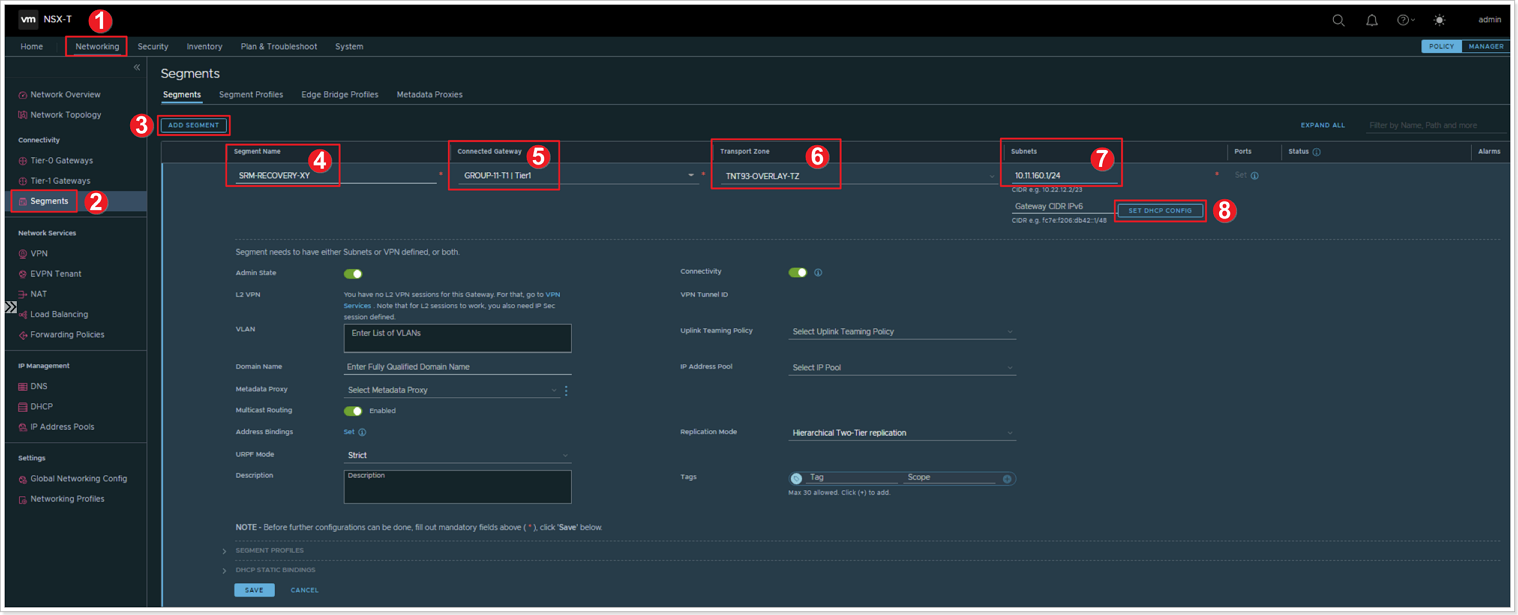
- In the Recovery Site NSX-T interface click Networking.
- Click Segments.
- Click ADD SEGMENT.
- Give the segment a name: SRM-RECOVERY-XY.
- Select the appropriate T1 Connected Gateway. Use the default TNT**-T1 gateway in the recovery site.
- Select the appropriate Transport Zone overlay - TNT**-OVERLAY-TZ.
- For Subnets add 10.XY.160.1/24.
- Click SET DHCP CONFIG.
Step 2: Set DHCP Configuration
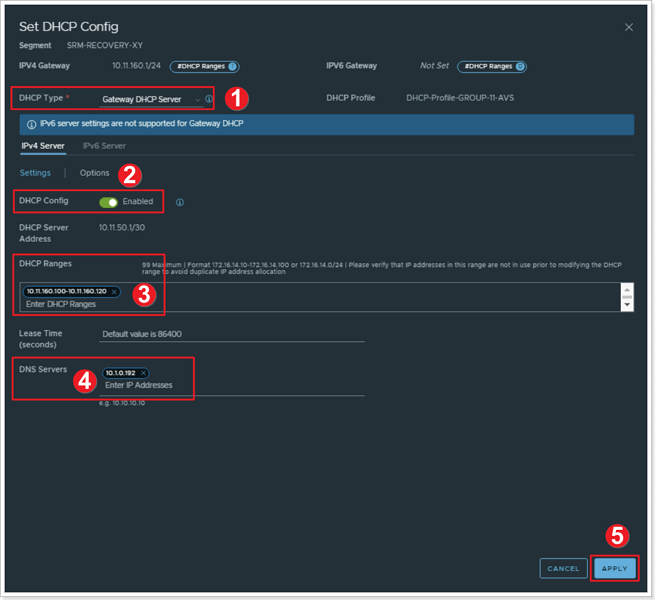
- Ensure the DHCP Type is set to Gateway DHCP Server.
- Ensure the DHCP Config toggle button is set to Enabled.
- For DHCP Ranges enter: 10.XY.160.100-10.XY.160.120.
- For DNS Servers enter 10.1.0.192.
- Click APPLY, then SAVE the network segment configuration, click NO for the next question.
Feedback
Was this page helpful?
Glad to hear it! Please tell us how we can improve.
Sorry to hear that. Please tell us how we can improve.